The following series of pictures will chronicle this journey -- successes and follies. We will attempt to narrate the process as well, but those tidbits will likely be added in slowly over time. So check back often for the most up to date witty commentary by both Bob and Norm.
The Before:
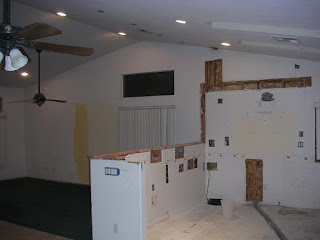
 Norm: This picture is from the open house before we actually purchased it. Any decor in this or the next picture is from the previous owner and did not come with the house. The maroon cabinets and pink floor tiles, unfortunately, did.
 Norm: Though the cabinets and tiles were not perfect, the size of the kitchen was fantastic, as well as the amount of natural light coming in from numerous windows. We saw nothing but potential! And so the journey begins...
The Demolition:
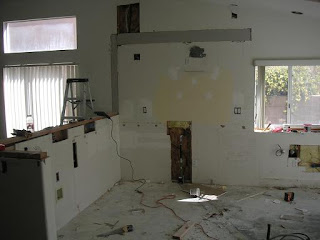
 Norm: The first thing to go was the wall separating the living room/formal dining room from the kitchen. Everyone wants a big open kitchen these days, and we are no exception. This picture shows the first removal of cabinets and appliances to make way for the wall demo.
 Norm: This is another view of the same. You can see in this picture that the island has been taken out. You can also see a sliver of the living room.
 Norm: Here you can see the wall slowly coming down. We had electrical wires in the wall that we had to work around, but after a few small mishaps, Bob's ingenuity saved the day. We were able to support the wires on a piece of old cabinetry to await the electrician who would be coming to rewire later in the week.

Norm: Another view of the same. From the kitchen looking into the living room.

Norm: Third view of the same with angle to see pass-through from one room to the other.
 Norm: Why look!! There's Master Craftsman Bob himself, come to chat about the progress of the wall demo. Questions, anyone?
 Norm: Finally the wall frame is down to the correct height. A little uneven along the top, but definitely progress. It's starting to look like one big room now.
 Norm: Another view of the half wall. Notice in this picture the heavy soffits above the microwave area have also come down. No easy task, but Bob tackled it single-handedly. TIMBER!

Norm: This picture not only shows the full room as looking towards the kitchen, but it shows the sliding door that is now where the window was in "Before Picture 2". So much more natural light comes in! Also notice the continued demolition of the cabinets and appliances. They are slowly but surely making their way out of the kitchen and into the family room.
 Norm: Proper tools and safety equipment are very important in any project. Here Bob models safety goggles in plastic, paired with durable gray work gloves. Looking stylish Bob! He also demonstrates the proper uses of a Chop Saw. Silly Bob! He's such a pro he can make straight cuts with his eyes closed! (*note* do not try this at home. Bob is a professional and recommends that all power tools be operated with careful attention and open eyes)
The Rebuild:

Norm: The electrician has finally come! It's better than Christmas. Only in addition to leaving behind our new recessed lighting and kitchen wiring, he has also left behind several dozen holes in our drywall. The plumber has also come, as can be seen from the trench in the middle of the floor (diagonal to right) and missing drywall where the sink pipe was removed and relocated. The 220 electric line for the oven is coiled carefully in the corner. Both the 220 and a new gas line for the island cooktop will be run through the trench before the floor is repaired.

Norm: Let there be light!
 Norm: This shows another view of the new recessed lighting, as well as another view of all the drywall holes. You can see we had the ceiling fan relocated to be in the center of the new living room (rather than over a hypothetical dining table). I also tested out a few paint shades both in the kitchen and living room. The lighter yellow will be the base color with the darker yellow chiming in on the accents.
 Norm: The old appliances, patiently waiting in the hallway for removal. Does anyone need a gas stove? Cheap to a good home! Haul away only.
  Norm: With most of the demolition finally complete, Bob begins to brace the new half wall, using the conveniently large holes left by the electrician for access. The top of the wall is now both level and the correct height.
Norm: Here I am, looking my best. I don't always dress up this much to repair drywall, but I knew Bob would come along to take some photos, so forgive me if I went a little overboard. Remember kids, it's important to follow proper safety measures and wear dust masks when working with drywall.
Norm: After an entire day of patching drywall holes, it still looks like swiss cheese in the kitchen. Directly center in the picture is the patch from the previous picture, with various other patches spreading over the half wall and back wall. Clearly, there is still many hours of drywall fun in store for Bob and I at this stage.
 Norm: Another view of drywall patches. You can also see in this picture all the floor tiles have finally been pulled up and the 220 line and gas line have been run through the trench. The trench has also been filled back in with concrete.

Norm: I am not really sure what this picture is supposed to show... if not just more drywall holes. It might seem tedious to keep seeing pictures of drywall holes, but trust me when I say it is not nearly as tedious as patching them all.

Norm: This is a neat picture because it shows where we ripped out the florescent lighting in those rectangle holes and are replacing it with track lighting. One of the holes, however, will need to be filled in with drywall. Bob has begun his ingenious patching technique on the far hole.

Norm: Oh look, there's me again. Proudly standing beside my expert patches.

Norm: Here I am in a moment of glory. The corners of this wall were nearly impossible to repair accurately. But after a little patience and instructions on how to use shims, I conquered the wall.

Norm: While I was conquering the corner, Bob was mastering the ceiling patches with the help of the neighbor's extra tall ladder. Great work!

Norm: Another view of the ceiling.

Norm: This shows the perfectly even patch along the top two inches of the half wall, as well as the completed bracing. After we add the spackle and texture, this wall should be finished and ready for cabinets and granite.
Please move on to Part II: Kitchen Remodel
2 comments:
Ty Pennington, move over!! There's a new crew in town! Awesome, guys! I'm so impressed!
Wow Norm! You and Bob are amazing. It was a pleasure to be a ghost tile remover. I look forward to working with you in the future!
Post a Comment